Animation of Deformations
Animating an Object/Material, whatever as it is is not the only thing you can do in Blender. You can change, reshape, deform your objects in time!
There are many ways of acheiving this actually, and one technique is so powerfull and general there is a full chapter for it: Character animation. The other techniques will be handled here.
Absolute Vertex Keys
VertexKeys, as opposed to Object keys, the specified positions of objects, can also be created in Blender; VertexKeys are the specified positions of vertices within an Object. Since this can involve thousands of vertices, separate motion curves are not created for each vertex, the traditional Key position system is used instead. A single IpoCurve is used to determine how interpolation is performed and the times at which a VertexKey can be seen.
VertexKeys are part of the Object Data, not of the Object. When duplicating the Object Data, the associated VertexKey block is also copied. It is not possible to permit multiple Objects to share the same VertexKeys in Blender, since it would not be very practical.
The Vertex Key block is universal and understands the distinction between a Mesh, a Curve, a Surface or a Lattice. The interface and use is therefore unified. Working with Mesh VertexKeys is explained in detail in this section, which also contains a number of brief comments on the other Object Data.
The first VertexKey position that is created is always the reference Key. This key defines the texture coordinates. Only if this Key is active can the faces and curves, or the number of vertices, be changed. It is allowed to assign other Keys a different number of vertices. The Key system automatically interpolates this.
A practical example is given below. When working with VertexKeys, it
is very handy to have an IpoWindow open. Use the first Screen from the
standard Blender file, for example. In the IpoWindow, we must then
specify that we want to see the VertexKeys. Do this using the Icon
button with the vertex square (
 ). Go to the 3DWindow with the mouse
cursor and press IKEY. With a Mesh object selected and active.
The "Insert Key" menu has several options, the latter being Mesh. As soon
as this has been selected, a new dialog appears (Figure 2 in the Section called The IPO Curves in the chapter called Animation of Undeformed Objects) asking for Relative or
absolute Vertex Key.
). Go to the 3DWindow with the mouse
cursor and press IKEY. With a Mesh object selected and active.
The "Insert Key" menu has several options, the latter being Mesh. As soon
as this has been selected, a new dialog appears (Figure 2 in the Section called The IPO Curves in the chapter called Animation of Undeformed Objects) asking for Relative or
absolute Vertex Key.
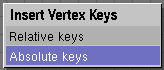
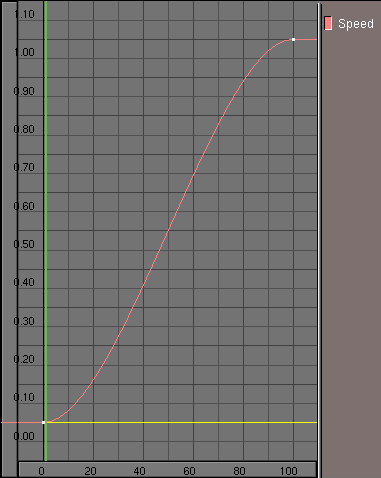
We will choose "Absolute Vertex Key" a yellow horizontal line is drawn in the IpoWindow. This is the first key and thus the reference Key. An IpoCurve is also created for "Speed" (Figure 3 in the Section called The IPO Curves in the chapter called Animation of Undeformed Objects).
 | Vertex Key creation |
|---|---|
Creating VertexKeys in Blender is very simple, but the fact that the system is very sensitive in terms of its configuration, can cause a number of 'invisible' things to happen. The following rule must therefore be taken into consideration. As soon as a VertexKey position is inserted it is immediately active. All subsequent changes in the Mesh are linked to this Key position. It is therefore important that the Key position be added before editing begins. |
Go a few frames further and again select: IKEY, ENTER (in the 3DWindow). The second Key is drawn as a light blue line. This is a normal Key; this key and all subsequent Keys affect only the vertex information. Press TAB for EditMode and translate one of the vertices in the Mesh. Then browse a few frames back: nothing happens! As long as we are in EditMode, other VertexKeys are not applied. What you see in EditMode is always the active VertexKey.
Leave EditMode and browse through the frames again. We now see the effect of the VertexKey system. VertexKeys can only be selected in the IpoWindow. We always do this out of EditMode: the 'contents' of the VertexKey are now temporarily displayed in the Mesh. We can edit the specified Key by starting Editmode.
There are three methods for working with Vertex Keys:
The 'performance animation' method. This method works entirely in EditMode, chronologically from position to position:
Insert Key. The reference is specified.
A few frames further: Insert Key. Edit the Mesh for the second position.
A few frames further: Insert Key. Edit the Mesh for the third position.
Continue the above process...
The 'editing' method.
We first insert all of the required Keys, unless we have eady created the Keys using the method described above.
Blender is not in EditMode.
Select a Key. Now start EditMode, change the Mesh and leave EditMode.
Select a Key. Start EditMode, change the Mesh and leave EditMode.
Continue the above process....
The 'insert' method
Whether or not there are already Keys and whether or not we are in EditMode does not matter in this method.
Go to the frame in which the new Key must be inserted.
Insert Key.
Go to a new frame, Insert Key.
Continue the above process...
While in EditMode, the Keys cannot be switched. If the user attempts to do so, a warning appears.
Each Key is represented by a line which is drawn at a given height. Height is chosen so that the key intersects the "Speed" IPO at the frame at which the Key is taken.
Both the IpoCurve and the VertexKey can be separately selected with RMB. Since it would otherwise be too difficult working with them, selection of the Key lines is switched off when the curve is in EditMode. The channel button can be used to temporarily hide the curve (SHIFT-LMB on "Speed") to make it easier to select Keys.
The Key lines in the IpoWindow, once taken, can be placed at any vertical position. Select the line and use Grab mode to do this. The IpoCurve can also be processed here in the same way as described in the previous chapter. Instead of a 'value', however, the curve determines the interpolation between the Keys, e.g. a sine curve can be used to create a cyclical animation.
During the animation the frame count gives a certain value of the speed IPO, which is used to chose the Key(s) which is/are to be used, possibly with interpolation, to produce the deformed mesh.
The Speed IPO has the standard behaviour of an IPO, also for interpolation. The Key line has three different interpolation types. Press TKEY with a Key line selected to to open a menu with the options:
Linear: interpolation between the Keys is linear. The Key line is displayed as a dotted line
Cardinal: interpolation between the Keys is fluid, the standard setting.
BSpline: interpolation between the Keys is extra fluid and includes four Keys in the interpolation calculation. The positions are no longer displayed precisely, however. The Key line is drawn as a dashed line.
Figure 3 shows a simple Vertex Key animation of a cylinder. When run the cylinder deforms to a big star, then deforms to a small star, then, since the Speed IPO goes back to 0 the deformation is repeated in reverse order.
Some useful tips:
Key positions are always added with IKEY, even if they are located at the same position. Use this to copy positions when inserting. Two key lines at the same position can also be used to change the effect of the interpolation.
If no Keys are selected, EditMode can be invoked as usual. However, when you leave EditMode, all changes are undone. Insert the Key in EditMode in this case.
For Keys, there is no difference between selected and active. It is therefore not possible to select multiple Keys.
When working with Keys with differing numbers of vertices, the faces can become disordered. There are no tools that can be used to specify precise sequence of vertices. This option is actually suitable only for Meshes that have only vertices such as Halos.
The Slurph button in the Animation buttons is an interesting option. The Slurph number indicates the interpolation of Keys per vertex with a fixed delay. The first vertex comes first and the last vertex has a delay of "Slurph" frames. This effect makes it possible to create very interesting and lively Key framing. Pay special attention to the sequence of the vertices for Meshes. They can be sorted using the button Xsort in the Edit Buttons or made random using the command Hash of the same buttons. This must of course be done before the VertexKeys are created. Otherwise, unpredictable things can will happen (this is great for Halos though!).