Key Frames
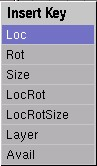
The simplest method for creating an object IPO is with the "Insert key" (IKEY) command in the 3DWindow. A Pop-up menu provides a wide selection of options (Figure 1). We will select the topmost option: Loc. Now the current location X-Y-Z, is saved and everything takes place automatically:
If there is no IPO block, a new one is created and linked to the object.
If there are no IPOCurves in the channels LocX, LocY and LocZ, these are created.
Vertices are then added in the IPOCurves with the exact values of the object location.
We go 30 frames further on (3 x UPARROW) and move the object. Again we use IKEY and immediately press ENTER. The new position is inserted in the IPOCurves. We can see this by slowly paging back through the frames (LEFTARROW). The object moves between the two positions.
In this way, you can create the animation by paging through the frames, position by position. Note that the location of the object is directly linked to the curves. When you change frames, the IPOs are always re-evaluated and re-applied. You can freely move the object within the same frame, but since you have changed frame, the object 'jumps' to the position determined by the IPO.
The rotation and size of the object are completely free in this example. They can be changed or animated with the "Insert key".
The other options in the Insert Key menu concern other possible IPOs, such as Rotation, Size and any combination of these.