
|
Introduction | |
Securing Access Point Setup |
|
Securing Access to Wireless Data | |
Advanced Security Maintenance |
|
Wireless Data Encryption |
An advantage of the IEEE 802.11 standard for wireless networks is that it provides a quick and easy way to connect your wireless station to a network. For instance, TrueMobile stations that have been configured with the network name "ANY" will connect to the first IEEE 802.11 compatible access point it can find within range.
The drawback of this quick and easy connectivity is the vulnerability of the LAN to unauthorized access. However, TrueMobile LANs are secure because access to network resources is controlled via standard security mechanisms, such as user names and passwords, as implemented by all network operating systems. TrueMobile LANs are also secure because you can apply additional security measures to restrict access to your wireless network resources.
Depending on the level of security required in your network environment, these measures may include:
To prevent unauthorized TrueMobile stations from accessing data that is transmitted over the network, the TrueMobile products support the following levels of security:
The security measures that apply to communications at the physical layer complement the user name and password validation at the network layer, as implemented by standard network operating systems.
To exclude unknown and unauthorized computing devices from establishing a wireless connection to the network, use the following options:
Closing the wireless network prevents unauthorized users from accessing the TrueMobile access point within a specified TrueMobile network. If a user tries to access the TrueMobile network without configuring their station with the correct TrueMobile network name, the station will not be able to bridge data on the access point.
There are two options for this type of access security are:
 |
NOTE: The Closed option is not compliant with the IEEE 802.11 standard for wireless LANs. |
To close your TrueMobile network:
Your access point will automatically reboot and start bridging operation again allowing access only to those users that have been configured with the same TrueMobile network name as identified in the setup of your access point(s).
Repeat steps 1 through 9 for all other access points.
Another method to restrict wireless access to the TrueMobile access points is to use the access control table feature and/or the RADIUS Server Access Control feature.
If you decide to enable the access control table feature, your access points will:
Enabling access control is a more rigid security mechanism than "Closing the Wireless Network", because it requires the LAN administrators to authorize each individual TrueMobile PC Card.
To authorize wireless stations to access the network, the LAN administrator(s) must append the unique universal MAC address of the TrueMobile PC Cards to the access control table file (*.tbl) and upload the access control table file to all access points.
|
NOTE: The access control feature does not work in network environments that require local MAC addressing. |
If you decide to enable RADIUS Access Control, you can:
To enable RADIUS Server Access Control see "Enabling RADIUS Server Access Control".
To enable access control you first need to create an access control table file (*.tbl) using the TrueMobile AP Manager program.
You can upload the access control table file into all access points in your network as part of a configuration (see "Importing an Access Control Table").
To create or edit the access control table:

To save the table to all TrueMobile access points, see "Importing an Access Control Table". Also see "Common Parameters".
To import an access control table file (*.tbl) to your access points:
To disable access control for your TrueMobile access points:
RADIUS Server Access Control is a method where you use TrueMobile access points in combination with a third-party RADIUS server.
To use RADIUS Server Access Control:
RADIUS Access Control enables you to:
For each RADIUS server you need to specify:
To restrict access to your network using MAC address control via a RADIUS server:
For more information, press <F1> to see the TrueMobile AP Manager online help file.
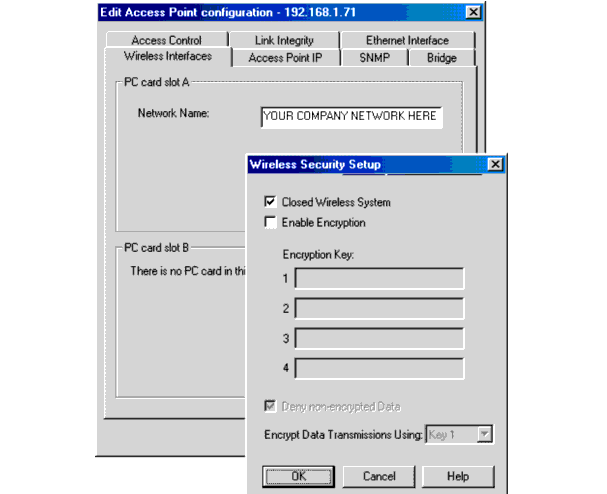
To provide the highest level of security to wireless data transmitted via your TrueMobile network, you can use the Wired Equivalent Privacy (WEP) data encryption.
|
NOTE: The WEP data encryption option is only available to TrueMobile
Silver and TrueMobile Gold cards. To use WEP
data encryption in your network:
|
WEP data encryption uses 5-character encryption keys, based on the RC4 encryption algorithm, that will be used to encrypt/decrypt all data transmitted via the wireless interface. TrueMobile Gold cards are based on a 13-character encryption key.
You can specify up to 4 different keys to decrypt wireless data, and select one of the specified decryption key values to encrypt wireless data.
The option to use 4 different keys for decrypting wireless data allows you to change your WEP keys at regular intervals without affecting regular network performance (see "Maintaining WEP Encryption Keys").
To enable WEP encryption, ensure that:
You should use the TrueMobile access point configuration log to write down the proposed WEP key values. Store the information in a safe place.

WEP data encryption enables you to encrypt all data that will be transmitted over the wireless LAN network.
To use WEP within your network all access points and wireless stations must be equipped with TrueMobile Silver and Gold cards, that have been configured to use identical encryption keys.
To enable encryption:
You can also choose to configure your TrueMobile access point to allow or deny non-encrypted data.
If you select to enable encryption you may choose to enter up to four encryption keys.
For the TrueMobile Silver card valid values are either:
For the TrueMobile Gold card valid values are either:
|
NOTE: The WEP key values you enter will remain visible only when you enter the character strings. As soon as you close the Security Setup window, the values will be stored in hidden characters: i.e. a next time the Security Setup window will be displayed, you will not be able to read the WEP key values anymore. You are advised to write down the values you enter, prior to closing the window. |
If you enable WEP encryption, you can select one key for wireless data transmissions from the list of WEP encryption key values. You can only select a transmit key that has a correct WEP encryption key value assigned. In case you specified no more than two key values, you can only select the transmit key from these two values.
| NOTE: If Deny Non-encrypted Data is not checked, your TrueMobile access point may also transmit in non-encrypting mode. |
If you decide to use wireless data encryption, you should encrypt all data that will be transmitted over the wireless network.
In some cases however you may wish to choose to allow the access point also to process non-encrypted data as well.
Examples of such situations might be that:
If stations are started with their default configurations, these stations would not be able to establish an initial connection to the network because they would not be able to interpret the encrypted beacon messages.
For optimal security against unauthorized access to your network, you should always leave the Deny Non-encrypted Data option enabled.
| NOTE: Only when you would have good reasons to decide otherwise, you could uncheck the Deny Non-encrypted Data to allow the TrueMobile access point to communicate with wireless stations that either support WEP encryption or not, or have the WEP encryption enabled or disabled. Read the information described in the following section before unchecking Deny Non-encrypted Data. |
The IEEE 802.11 standard on wireless LANs was designed to provide an easy to use and easy to install wireless network that allows users to combine wireless LAN products from different vendors.
The drawback of easy access and interoperability is the vulnerability to unauthorized access to and/or use of your network. Although WEP encryption provides a good way to secure access to your wireless data, you need to know a few things to ensure that your network provides the right level of security.
When you enable WEP encryption there are two modes of WEP operation are available:
For optimal security, you should always to use the Deny Non-encrypted Data option.
Enable Encryption and Deny Non-encrypted Data
When you select to enable encryption and deny non-encrypted data, your TrueMobile access point will:
If your network includes wireless stations configured with a non-matching WEP key, or equipped with TrueMobile PC Cards that does not support WEP encryption, such stations will not be able to establish a wireless connection because they will not be able to understand (decrypt) crucial network information.
Enable Encryption and Allow Non-encrypted Data
When you select to enable encryption, but you unchecked Deny Non-encrypted Data, the TrueMobile access point will:
This behavior of the TrueMobile access point is not related to the way the wireless message was received at the access point. If for example a wireless station that uses WEP encryption wants to send data to another station in the same wireless cell, the data transmission will:
| NOTE: For most network environments that require a higher level of security than the standard security mechanisms supported by TrueMobile and most of today's network operating systems (e.g. user names and passwords), Dell recommends that you do not use this option unless easy access and/or migration is more critical to your data network than top- level security. |
To minimize the risk that intruders might be able to retrieve the WEP key values, you should:
The option to enter up to four different keys to decrypt data received HIDW_security_wep_keys via the wireless interface, enables you to define a WEP key roll-over scheme.
For example you could choose to select another transmit key every x weeks, until you reach the fourth key. At that point in time you could enter three new WEP key values for the first three WEP key entries, prior to the expiration period of the fourth key value. Once all stations and access points have been set to use the first new key again, you can replace the fourth key value with a new WEP key value.
Security measures, such as access control, become ineffective when unauthorized persons can view and modify the configuration of your TrueMobile access points.
To protect your network configuration from undesired modifications, you should implement the following measures:
To restrict access to the TrueMobile access point configuration information, you can create two authority levels for passwords: Read password and read/write password.
A read password will only provides access to the access point to monitor diagnostic information found under Monitor in the AP Manager window.
You can define a read password in the Read Password field on the SNMP tab (select the access point from list, click Edit, and click SNMP tab). The default value is public.
A read/write password provides you with full access to display TrueMobile access point diagnostic information found under Monitor, as well as the configuration settings found under Edit.
Entering an incorrect password will result in a time-out error or the following message: SNMP error no such name.
To define a read/write password:
In addition to the read and read/write passwords, you can restrict access to the TrueMobile access point configuration to a limited number of authorized stations.
To authorize the TrueMobile management station to access access points, you must identify:
If you want to authorize multiple stations, you can identify a range of IP addresses that you will reserve for authorized LAN administrator stations.
|
NOTE: When using the SNMP IP access list, you should include the IP address of all stations that will need to retrieve configuration or diagnostic information of the access point (for example, stations of administrators who use either read or read/write passwords). |
When the IP address or interface does not match the listing in the SNMP IP access list, the requester will receive a time-out error.
To authorize a management station via the SNMP IP access list:
The default value is <All will be permitted>.
You can use the Trap Host mechanism to inform a network administrator when somebody resets the TrueMobile access point, performs the forced reload procedure, or if there is an authentication failure, or if a link up or down is detected. The trap host alert will enable the network administrator to verify whether the reset or forced reload action was an authorized action or not.
To activate the trap host mechanism:
When you activate the trap host alerts, be aware of the following:
The following message types can be distinguished:
A Call Boot Trap Message can occur in one of the following situations:
Authentication Failure Messages
This message type is sent to the LAN administrator station once a wrong password has been entered on a station. However, if the access point itself does not respond, a time out error occurs.
This kind of message can be used in case of link integrity. If, for example, in a duplicate Ethernet connection an Ethernet link is broken automatically a link down message can be generated. As a result of this message, the other Ethernet connection will be used. Once the link is restored the original connection, a "link up" message will be generated. The original connection will be used again.
Dell recommends that you create a single access control table and store it on the hard drive of the LAN administrator station and share it with other LAN administrator stations. You should use only one table for all access points.
For more information, see "Creating/Editing an Access Control Table".
The WEP Encryption functionality enables the TrueMobile system to support up to four different keys simultaneously. This is in accordance with the 802.11 standard, which defines four default keys.
These keys can be used to smooth the transition from the usage of one key to usage of a next key. The general requirement for two cards to transmit encrypted between each other is that they share a common key value at the same key-index number in the four-key area at the moment of transmission. The key-index of the key that was used for encryption is transmitted in clear-text in the header of the message and will be used at the receiving side to determine which of the four keys to use for decryption.
It is not mandatory that both sides (typically an access point and a TrueMobile station) have the same active set of four keys. As long as they both use a common key, they can communicate.
|
NOTE: The 802.11 standard also defines the possibility of having a unique key per station, which is tied to the station's MAC address. TrueMobile currently does not support this feature of the standard WEP function. |
When planning the usage of different keys over time, you should consider the following:
The key roll-over possibilities built in the 802.11 standard and offered by TrueMobile allow for a number of scenarios, each with different values for the above aspects.
The sequence of key configuration settings at access point (shown as AP) and TrueMobile station (shown as STA) over time is shown in a number of tables below. Each table reflects a certain key roll-over strategy. Notice that the column Outward Key shows which key is used to encrypt traffic from AP to STA, and the column Inward Key(s) indicates the key(s) that are allowed and possibly used to encrypt traffic from STA to AP. The WEP Keys that are configured are shown in order of index number 1-2-3-4; the column Tx is the index number configured for transmission. The key values are shown by capital letters to indicate a real key or by zero to indicate a non-configured index.
The column Keys 1-2-3-4 shows an equal sign (=) when the value does not change from the previous period. This is particularly relevant when it concerns the TrueMobile stations keys, since it is envisaged that knowledge of the key values is typically not transferred to the end users, so they have to return their TrueMobile station equipment to the network administrator to get the key values changed. It is envisaged that changing the Txkey Index is an action that can be done by end users, since it does not reveal secret information.
The three key roll-over strategies are:
The "Single Key - No Transition" table shows a system where at each point in time only one single key is used. The key to be used is dictated by the AP settings, showing only one valid key at each period. This requires a change over of keys at all TrueMobile stations more or less synchronous with the access point configuration changes. This is not practical and hence there are four keys.
|
Period |
AP Configuration |
Outward |
STA Configuration(s) |
Inward |
|||
|
# |
Description |
Keys 1-2-3-4 |
TX |
Key |
Keys 1-2-3-4 |
TX |
Key |
|
0 |
Main life key A |
A-0-0-0 |
1 |
A |
A-B-C-D |
1 |
A |
|
1 |
Main life key B |
0-B-0-0 |
2 |
B |
= |
2 |
B |
|
2 |
Main life key C |
0-0-C-0 |
3 |
C |
= |
3 |
C |
|
3 |
Main life key D |
0-0-0-D |
4 |
D |
= |
4 |
D |
|
4 |
Main life key E |
E-0-0-0 |
1 |
E |
E-F-G-H |
1 |
E |
|
5 |
Main life key F |
0-F-0-0 |
2 |
F |
= |
2 |
F |
By initially configuring all stations with the keys for the first 4 periods, only the Txkey index needs to be changed at all stations for the first three steps. At the step from period 3 to period 4, the keys also have to be changed at all STAs.
To introduce a transition period between the main life of the successive keys, the scheme has to be changed as shown in the "Single Key - Transition Period" table.
Single Key - Transition Period
|
Period |
AP Configuration |
Outward |
STA Configuration(s) |
Inward |
|||
|
# |
Description |
Keys 1-2-3-4 |
TX |
Key |
Keys 1-2-3-4 |
TX |
Key |
|
0 |
Main life key A |
A-0-0-0 |
1 |
A |
A-B-C-D |
1 |
A |
|
1 |
Transition A-B |
A-B-0-0 |
2 |
B |
= |
1|2 |
A | B |
|
2 |
Main life key B |
0-B-0-0 |
2 |
B |
= |
2 |
B |
|
3 |
Transition B-C |
0-B-C-0 |
3 |
C |
= |
2|3 |
B | C |
|
4 |
Main life key C |
0-0-C-0 |
3 |
C |
= |
3 |
C |
|
5 |
Transition C-D |
0-0-C-D |
4 |
D |
= |
3|4 |
C | D |
|
6 |
Main life key D |
0-0-0-D |
4 |
D |
= |
4 |
D |
|
7 |
Transition D-E |
E-0-0-D |
1 |
E |
A-B-C-D |
4 |
D |
|
8 |
Main life key E |
E-0-0-0 |
1 |
E |
E-F-G-H |
1 |
E |
|
9 |
Transition E-F |
E-F-0-0 |
2 |
F |
= |
1|2 |
E | F |
Notice that in the transition periods 1, 3, and 5, the end users can switch over from one Txkey index to the next. At the end of this period, all stations must be over to the new key index. Transition period 7 includes the transition to a new set of keys as well. The total length of time a key is used consists here of the main life time period and two transition periods. Assuming the main life is much bigger than the transition, this can still be considered to be a single key scheme, because most of the time only a single key is in use.
Alternative schemes can be envisaged, which have main life periods in which two or more keys are active. An example is given in the "Alternative Schemes" table.
|
Period |
AP Configuration |
Outward |
STA Configuration(s) |
Inward |
|||
|
# |
Description |
Keys 1-2-3-4 |
TX |
Key |
Keys 1-2-3-4 |
TX |
Key |
|
0 |
Main life key A |
A-0-0-0 |
1 |
A |
A-B-C-D |
1 |
A |
|
1 |
Main life A+B |
A-B-0-0 |
2 |
B |
= |
1|2 |
A | B |
|
2 |
Main life B+C |
0-B-C-0 |
3 |
C |
= |
2|3 |
B | C |
|
3 |
Main life C+D |
0-0-C-D |
4 |
D |
= |
3|4 |
C | D |
|
4 |
Main life D+E |
E-0-0-D |
1 |
E |
A-B-C-D |
4 |
D |
|
5 |
Main life E+F |
E-F-0-0 |
2 |
F |
E-F-G-H |
1|2 |
E | F |
The "Alternative Schemes" table gives a scheme where at each period two keys are in use; at the end of each period, the oldest key is no longer valid and needs to be replaced at all TrueMobile stations. Advantage of this scheme versus the scheme in the "Single Key - Transition Period" table is that it requires less frequent configuration changes at all access points.