

Getting started with 3D
Blender start-up

Click to enlarge
Installation done? Then you're ready for take off.
Start up Blender as described in the installation section. Start-up should be finished within a few seconds.
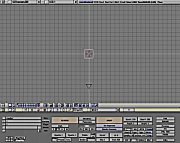
What you see is the contents and window layout of the $HOME/.B.blend file. This file is a regular Blender file and is the default file that loads automatically on start-up. A user can create his own default windows, pre-set Materials, models, directories, etc. You can save the user defaults at any time by pressing CTRL+U.
Quick-start guide pt 1
3D view manipulation
The largest window is the 3DWindow. It displays a Mesh plane (the square), a Camera and a 3Dcursor.- Click with LeftMouse in the 3DWindow. The 3Dcursor moves to this location. The 3Dcursor is important to indicate where new Objects appear and for rotating and scaling purposes.
- Click, hold and move MiddleMouse in the 3D window. This is the 'trackball' style view rotation. Try this (click-hold-move) at different locations in the window to get used to the TrackBall method.
- Try the same while holding a SHIFT key. SHIFT+MiddleMouse is view translation.
- CTRL+MiddleMouse is for zooming in and out.
The translation and zoom options are also available as buttons in the header of each 3DWindow; press and hold these buttons with LeftMouse, and move the mouse.
All view-related commands are located in the numerical pad.
- For rotation: PAD_2 PAD_4, PAD_6, PAD_8 (note the arrow keys in these keys!).
- For translation, hold SHIFT while using PAD_2 PAD_4, PAD_6, PAD_8.
- PAD_PLUS and PAD_MINUS are for zoom in and zoom out.
View pre-sets
The standard pre-sets 'Top', 'Front' and 'Side' view are also available via the numerical pad- Top view: PAD_7.
- Front view: PAD_1.
- Side view: PAD_3.
The view selected is indicated in the header button.
View modes
The 3DWindow has three modes for viewing:- Orthonormal, the basic view mode for modeling.
- Perspective. Use the PAD_5 key to toggle Perspective and Orthonormal view mode.
- Camera view: press PAD_0. You can get rid of view mode this by invoking any view command.
Layers
Blender layers are used to organize work and control visibility. Each Object has a layer setting, Scenes and 3DWindows have layers as well, to determine which Objects are visible.
Currently, there are 20 layers available. Press MKEY to move an Object to a certain layer setting.
-> on to Part 2